Tuesday, October 4, 2011

Pumpkin-Banana Bread and October Family Update

FALL!!!

I finally found pumpkin at a store! And had some bananas sitting on the counter alongside my cans of pumpkin...sooo....pumpkin-banana bread!

I found this recipe online and followed it exactly. Lane took some of the bread to work and left it in the breakroom. Before the first break of the day (only a couple hours) he said the bread was completely gone! All that was left was a few crumbs...so I guess everyone thought it was delicious!! Try some, you can't help but FALL in love with it!! ;-)

Pumpkin Banana Bread
Ingredients
  • 2 ripe bananas, mashed
  • 2 eggs
  • 1/3 cup vegetable oil
  • 1 1/3 cups canned pumpkin puree
  • 1/2 cup honey
  • 1/2 cup white sugar
  • 2 1/2 cups all-purpose flour
  • 1 teaspoon baking powder
  • 1 teaspoon baking soda
  • 1/2 teaspoon salt
  • 2 teaspoons pumpkin pie spice
  • 1 teaspoon ground cinnamon
  • 3/4 cup raisins (optional)
  • 1/2 cup walnut pieces (optional)
Directions

  1. Preheat oven to 350 degrees F (175 degrees C). Grease an 9x5 inch loaf pan.
  2. In a large bowl, stir together the mashed banana, eggs, oil, pumpkin, honey and sugar. Combine the flour, baking powder, baking soda, salt, pie spice and cinnamon, stir into the banana mixture until just combined. Fold in the raisins and walnuts if desired. Pour batter into the prepared pan.
  3. Bake at 350 degrees F (175 degrees C) for 45 minutes, or until a toothpick inserted into the center of the loaf comes out clean. Cool loaf in the pan for 10 minutes before moving to a wire rack to cool completely.

And a family update...
Andrew is now a month old! I can't believe it!! He's getting bigger all the time, and is wonderfully healthy. :-)
Ethan is still loving his role as big brother! Despite a few "two year old" traits that he seems to have picked up recently, he's still a great kid :-)
Lane is still loving his job at Current, and is doing a great job of upselling! He keeps getting prizes from the prize table! ;-)
I'm doing well, recovering, trying not to obsess over cleaning my house all the time, and starting a new job with Mary Kay! I'm super excited!

Keep a lookout for many more recipes from me soon! I'm planning on doing lots of cookie baking and stuff for the holidays!! (Anyone up for some Christmas cookies??)

Sunday, September 18, 2011

A Little Family Update...

Hello Friends, Family and Followers!!

It feels like forever since I posted here last...probably because it has been quite awhile!! I stopped baking so much when my doctor told me to watch my 3rd trimester weight gain, but it's almost Christmas now, so I'll be making lots of new yummies to share!!

I just wanted to take a minute to update you all on our life and share some adorable pictures with you :-)

Baby Andrew is here! Born September 3, 2011 at 8:09am. He was 7 pounds 10 ounces and 21 1/2 inches long. A tiny little package of adorable and blessing <3

Big Brother Ethan is loving his new little brother, and is really good with him! (So far!!) He loves to "help" me change his diaper, and always worries if Andrew starts crying or whimpering! He seems to be adjusting to his new role pretty well, though there are a few "terrible two's" attitudes and actions that are showing up towards mommy now! We're working on them though, and he's a pretty good kid overall :-)


I am healing well and loving life as a new mommy all over again. I do wish I could have a little more sleep!! But I know that is coming soon enough. I'm halfway through my first set of classes for this semester...just 4 weeks left!


Lane started working at Current last week, and loves it so far! It's a good job with great hours and lots of room for overtime and moving up. He's excited because he has his own cubicle :-P He's also taking courses this semester, and is doing well (though he doesn't care for most of his classmates...a lot of the posts are just ridiculous!).


We all are looking forward to the cooler fall weather...and of course Christmas soon!! (hehe) I'll be posting more recipes and fun stuff soon...I'm almost back to being fully organized again!

Love and hugs,
*The Wallaces*

Sunday, July 31, 2011

Pancakes for all days...

...even those in which you have no eggs or milk! (or for those who happen to be allergic to such things!)

Very simple recipe that took only a few minutes to whip up, and a very short while to cook! The batch made enough for us to have breakfast this morning, and freeze a meal's worth for later this week (yay for saving time!).

I found the original recipe last night and just had to try it. I have an overabundance of flour (bought flour instead of sugar one grocery trip, and ended up with several bags of flour in my cabinet!) and a general lack of milk (need to get to the store...my little man drinks it all!), so this was perfect.


Milkless & Eggless Pancakes

Ingredients:
1 1/4 cup of Flour
2 teaspoons of Baking Powder
3/4 teaspoon of Salt
2 tablespoons of Sugar
3 tablespoons of veg oil
2 -3 tablespoons of Applesauce
1 1/4 cup of Water
 
Directions:
1. Combine all ingredients.
2. Bake up some pancakes!
3. Enjoy!

Thursday, July 21, 2011

Healthy Cookies! (supposedly...)

I had a couple of oranges in my fridge that needed to be used up before they went bad. Since we don't really eat a lot of oranges, just cutting them up was out of the question...so I went looking for an orangey idea...

and came across this.

Yummy, delicious, light, fluffy, frosted orange cookies. Oh. Yes.

I don't have any pictures because I was trying very hard to follow the recipe exactly and get it finished before my family showed up for Bible study this afternoon. BUT...if you look at the original recipe, my cookies looked like that...without the orange slices on top. :-)

SO yummy! Kimberly tried to tell me they were terrible and I should just let her "get rid of" them ;-)

Ingredients:
COOKIE DOUGH:
11 Tbsp (5½ ounces) unsalted butter
3/4 cup (5¼ ounces) granulated sugar
1 tsp vanilla extract
1/2 tsp baking powder
1/2 tsp baking soda
1/2 tsp salt
1 large egg
1/2 cup (4 ounces) freshly squeezed orange juice (grate zest before juicing)
2 Tbsp grated orange zest (the rind of 1 large or 2 small oranges)
2 cups (8 ounces) whole wheat flour
ICING:
2 cups (8 ounces) powdered sugar
2 Tbsp (1 ounce) unsalted butter, softened
1 Tbsp grated orange zest (the rind of 1 small orange)
1/4 tsp vanilla extract
1/8 tsp salt
2 Tbsp (1 ounce) freshly squeezed orange juice

Directions:
1. Preheat oven to 350°F. Lightly grease 2 baking sheets or line with parchment paper.
2. Prepare dough: Cream butter, sugar, vanilla, baking powder, baking soda and salt in a medium bowl. Beat in egg, then orange juice and orange zest, scraping the bowl. The mixture will look curdled; that’s OK! Add the flour, beating until smooth. Drop dough by Tablespoonfuls onto the prepared baking sheets.
3. Bake the cookies: Bake cookies, reversing pans midway through (top to bottom, bottom to top), until they’re just barely beginning to brown around the edges, 10 minutes. Remove cookies from oven and let them cool on the pans for 10 minutes before transferring them to a rack to cool.
4. Prepare the icing: Beat the sugar, butter, orange zest, vanilla and salt in a medium bowl until well combined. Beat in orange juice until the mixture is spreadable. Spread icing on the cookies when they’re completely cool, using a generous 1 tsp. icing for each.
Servings: 30
Yield: 30 cookies

ENJOY!
 

Saturday, July 16, 2011

Life update...

No recipe today...but the promise of one soon!

I figured it would be a good idea to update everyone on our life in general...not just on what we eat!

Lane and I celebrated our 1st anniversary on the 7th of this month, and got to spend a relaxing weekend a few hours away from home at an adorable English bed and breakfast. It was so much fun! ((I love you babe!))

Just yesterday, Lane interviewed for and was offered a new job. This was perfect God-timing for our family! He was able to have a few weeks off since the last job, and is healthy again. Hopefully no more big illnesses are headed his way any time soon!
Lane at breakfast on our anniversary weekend away.


I am 32 1/2 weeks pregnant now, and getting very ready to have this little guy here and with us rather than inside me! No health problems, mom and baby are doing great, but my tummy is getting big and I'm ready for it to be small(er) again!
Preggo mommy around 31 weeks


Ethan is enjoying his summer time by spending the night at Nu-nuh and Papa's house, playing on the porch with Lady and getting to spend time with Mommy *and* Daddy! Next week he and I are going to start working on some "schoolwork" for him...he's already brilliant, I want to channel that into something productive early!
Daddy and Ethan playing play-doh for the first time.


As a family, we have started couponing, and working towards being a cash-only family. We are learning a lot from others both online and in our extended family who have been doing this for awhile, and are enjoying spending less and less each week on groceries and other expenses!

Lane and I start back to school at the end of August, so we're enjoying the last of our summer time too. It's nice to be off school, but it will be nice to be back into the schoolwork schedule for our days and have a little more daily structure.

I'm hoping to get started on all my scrapbooks soon too! I have over 500 pictures printed and ready to go, as well as tons of pages and 4 or 5 brand new empty books just waiting for my creative touch!

I'll be sure to keep updating as our life continues to change and our family grows. Keep an eye out for new recipes coming soon! I have a brand new chocolate cake recipe book, as well as a great "regular" cookbook that I will be starting to pull from more and more as the weeks go on (and I get more organized!).

God Bless!
*Hillary* (and the rest of the Wallace clan)

Thursday, July 14, 2011

Chocolate Cake...on a whim!

While watching an episode of Star Trek TNG, I started craving cake...because they were eating cake...so I found a quick recipe online and made up a delicious chocolate cake.

DELICIOUS. Chocolate. Cake.

You can't go wrong ;-)

This recipe has several variations, and I'm sure they are all as amazing as this one! Try them out and let me know!!

Ingredients:
2 1/3 cups flour
1 tablespoon baking powder
3/4 teaspoon salt
1 1/2 cups sugar
1/2 cup shortening (I used oil, per a suggestion in one of the comments on the original recipe. It worked GREAT!)
2 eggs
1 cup milk
1 teaspoon vanilla extract
1/4 cup baking cocoa powder

1. Sift together the dry ingredients.
2. Mix in the oil (or shortening) until fine crumbs are formed.
3. Add eggs, milk and vanilla. Mix well. (the original recipe calls for a mixer, but I did all my mixing by hand with a whisk.)
4. Pour batter into a greased and floured 9x13 pan. (I didn't flour mine, just made sure to use a lot of cooking spray) Bake in a preheated 350* oven for 25-30 minutes.
5. Let it cool, frost and enjoy!!

Sunday, July 10, 2011

Happy 4th of July!

So I know it's late...like a lot :-P...but I made a really cute "Red, White and Blue Breakfast" for the 4th, and just now got around to getting the pictures uploaded to share with you!

It's nothing fancy, just french toast made with french bread, some scrambled eggs, bacon, blueberry syrup and some (white) powdered sugar to top it all off...but it was fun and festive! Enjoy the pictures, and hopefully I'll actually bake/cook some more this week and have something real to share!!
yes, I dyed the scrambled eggs red ;-)

(nearly) white French toast

(kinda purple) BLUEberry syrup (see previous post about this recipe)

Red, white and blue!

and aside from looking so patriotic, it was delicious to boot!

Sunday, June 19, 2011

Breaded Ranch Cheesy Bacon Chicken

There are no pictures to go along with this post...and I feel badly that it has taken me so long to post again...I've been trying to find good food to make without focusing on sweets (which is all this preggo mama wants!!)

But I have a recipe at last! Tonight for dinner Lane requested chicken, and I didn't want to do something boring (or that took a long time to make, since it was already starting to get late)...so I came up with this...yes, all on my own!

Ingredients
Chicken breasts
Ranch dressing
Breadcrumbs
Sliced bacon
Shredded cheese

Directions
1. Preheat the oven to 350* and lightly grease  a baking pan.
2. Coat the chicken in the ranch dressing, then in bread crumbs. Place in the baking pan.
3. Microwave the bacon until nearly cooked completely. Lay the slices over the chicken breasts.
4. Top the chicken and bacon with the shredded cheese. Cover with tin foil.
5. Bake for 25-30 minutes or until chicken is baked through. (I removed the tin foil about halfway through to check on the chicken and allow the cheese/bacon to get a little more crispy.)
6. Serve with french bread and applesauce! (that's what we did at least...and it was awesome!!)

I'm hoping to get back into cooking/baking this week...we'll see how that goes!

Thursday, June 9, 2011

Twix Brownies

I did the Special K 2 Week Challenge to try to maintain my weight during the end of this past month, in hopes of not gaining too much and having my doctor be mad at me. I did pretty well, gaining only 4 pounds (rather than 9 like last month!) in 4 weeks.

So, to celebrate my fairly good eating habits........I made brownies. :-P And not just ANY brownies...these are TWIX Brownies.

Oh yum.

Now, next week I'm starting my careful eating and fruits/veggies (if I can find any I like) for snacks to keep the weight gain to baby necessary weight only, but for the rest of this weekend, I'm allowing myself to eat some brownies...and now you have to go make them so you can too ;-)

Twix brownies
Ingredients
4 tablespoons butter, softened
1/4 cup canola oil
1 2/3 cup sugar
2 eggs
1 teaspoon vanilla
1 1/3 cup + 3 tablespoons all-purpose flour
3/4 cup baking cocoa
1 teaspoon baking powder
pinch of salt
1 cup chocolate chips (the original calls for semi-sweet, but I used milk chocolate)
3 Twix candy bars, chopped (by 3, it means 3 of the small packages, or 6 individual bars, see the picture in the original recipe if you're confused.)
batter...oh yum
Directions
1. Preheat the oven to 350*.
2. In a large bowl, cream together the butter, oil and sugar. Add the eggs and vanilla and mix well.
3. Add the dry ingredients and mix until just combined.
4. Fold in the chocolate chips and Twix pieces.
5. Spread in the bottom of an 8x8 baking dish (I sprayed mine with cooking spray first, though the original doesn't call for it) and bake for 40-45 minutes. (Keep an eye on them, for me at higher altitude, it only took about 30 minutes to get completely cooked) Brownies are done when a toothpick inserted in the center comes out clean.
and the finished product...even more yum!!
Enjoy!!

Friday, June 3, 2011

Cookies in a Snap (Cake Mix Cookies)

So tonight is pizza/games night...and since pizza is pretty basic (and I'm not going to make anything from scratch this time around - I cheated and bought store bought pizza dough), I decided to throw together an easy dessert...I always feel like I have to make a dessert when Emily comes over...she always makes such delicious stuff you know!

But, since I was out of butter (how did that happen!??!), I needed a recipe that didn't call for butter (duh). I have made this recipe a few times already, with great results every time! But I haven't shared it with you all yet :-)

This is the BEST cookie recipe for short term notice guests or a need for a dessert in just a few minutes. I found it here, and it's a life saver!

Cake Mix Cookies
Ingredients
Cake mix (any flavor, I used "Butter Recipe Yellow")
1/3-1/2 cup oil (I always use 1/2 cup, haven't tried the 1/3)
2 eggs

Directions
1. Preheat oven to 350*. Line a baking sheet with parchment paper (the batch makes 20 cookies, so I use 2 baking sheets, one after the other)
2. Mix all ingredients together. Spoon the dough onto the baking sheet and bake for 10-13 minutes.

(I keep a close eye on my cookies. As soon as the edges turn light brown, remove them from the oven and let them sit for a minute. Usually takes about 10 minutes of baking for me). Let cookies cool on a wire rack, or eat them all right away :-)

Can't wait for after dinner now!!

Ragamuffins with Icing

I had waffles with blueberry sauce planned for dinner last night (see a few posts back on that recipe!) but I wanted to make something kinda sweet to go along with it for the boys (well, okay, and myself!).

I wanted something different than the usual cinnamon rolls or monkey bread though, so I did a little google-ing and came across these "Maple Sugar Ragamuffins" and decided that they sounded worth a try!

And they were! ((I apologize now for the lack of pictures...my final products were kinda ugly (though delicious!) and not really photo worthy...not to mention the rest of dinner that I was working on at the same time!!)

I made up the Ragamuffins and some simple cream cheese icing and they were yuuuummmmyy!! So here ya go :-)

((quick side note: this recipe calls for maple sugar...I used brown sugar...looking it up online doesn't really explain the difference between the two, but they worked out great, so I guess it's okay!))

Maple Sugar Ragamuffins
Ingredients
(for dough)
2 cups all-purpose flour
1 tablespoon granulated maple sugar
1 tablespoon baking powder
1/2 teaspoon salt
5 tablespoons cold unsalted butter, cut into small pieces
3/4 cup whole milk ((I only had 1% milk on hand, and they still turned out great!))

(for filling)
3/4 stick (6 tablespoons) unsalted butter, well softened
1 cup granulated maple sugar

parchment paper

Directions
(Make dough)
1. Put oven rack in middle position and preheat to 400*. Line a large backing sheet with parchment paper.
2. Whisk together flour, maple sugar, baking powder, and salt in a large bowl. Blend in butter with a pastry blender or your fingertips until most of mixture resembles coarse meal with some small (roughly pea sized) butter lumps. Add milk and stir with a fork until a shaggy dough forms. Gently knead dough 8 to 10 times with floured hands on a lightly floured surface.

(Roll out and fill dough)
1.  Roll out dough on a lightly floured surface with a floured rolling pin into a 13 by 11 inch rectangle. Spread softened butter evenly over dough and sprinkle all over with maple sugar, pressing firmly to help adhere. ((it seemed like a lot of butter while I was spreading it out, but as I worked across the rectangle a few times, it evened out alright))
2. Beginning with one long side, roll up dough snugly, jelly-roll style. Cut roll crosswise into 12 slices with a sharp knife. Arrange slices 2 inches apart on the baking sheet. Gather any maple sugar from the work surface and sprinkle on top of the rolls.
3. Bake until rolls are puffed and golden, 18-20 minutes. Transfer to a rack to cool until warm, about 15 minutes.

While they're cooling, you can make up this simple icing which took only a few seconds to whip up!

Icing
Ingredients
4 ounces cream cheese, softened
1/4 cup butter, softened
1 1/2 cups powdered sugar
1 1/2 teaspoons milk
1/2 teaspoon vanilla

Directions
Combine all ingredients until smooth. (I used a hand mixer in a small bowl) Enjoy!

((told you it was simple!))

Enjoy with breakfast or for dessert or whenever you want something yummy and sweet!

Thursday, June 2, 2011

Homemade French Bread

I have a newfound kitchen crush.
<3
Bread hooks for my HAND mixer! They were so much fun!! And since the bread turned out well, I shall probably use them more often than my stand-up mixer (which I haven't quite figured out the bread hooks on yet)!

Since we were having basic spaghetti for dinner last night, I decided to have the recipe for the day be a side of fresh baked French bread to go with it. I found an easy recipe online, and it turned out great!

Ingredients
5-6 cups of all-purpose (or bread) flour
5 teaspoons active dry yeast
2 teaspoons salt
2 cups warm water
1 tablespoon butter, melted
1 egg white
1 tablespoon water


Directions
1. ((I started out not following the recipe. Though the ingredients are the same, I used my knowledge of letting yeast get started before adding extra stuff to start it off...)) In a large bowl, combine the warm water with the yeast and let sit to activate while you prepare the next set of ingredients.

2. Add 2 cups of the flour and the salt to the yeast/water and beat until well blended using your mixer with dough hooks. Then stir in as much of the remaining flour as you can. (I got about 4 1/2 cups total mixed in before the next step)
3. On a lightly floured surface, knead in enough flour to make a stiff dough that is smooth and elastic. Knead for about 8 to 10 minutes total.

4. Shape into a ball. Place dough in a greased bowl and turn once. Cover, and let rise in a warm place until doubled (about 30 minutes to an hour. I left mine for 45 minutes)

5. Punch dough down, and divide in half. Turn out onto a lightly floured surface. Cover, and let rest for 10 minutes.
6. Roll each half into a large rectangle. Roll up, starting from a long side. (I didn't moisten the edge like the recipe calls for, I just smushed the edge together until it stuck). Taper the ends.
This one was a garlic/Parmesan loaf. This is the step to add things in (see the end of the recipe)
7. Grease a large baking sheet. Place loaves, seam side down, on the sheet. With a very sharp knife, make 3 or 4 diagonal cuts about 1/4 inch deep across the top of each loaf.
8. Beat the tablespoon of water with the egg white and brush on the top of each loaf. Cover with a damp cloth and let rise until nearly doubled (about 35 to 40 minutes).
9. Bake in a preheated oven at 375* for 20 minutes. Brush again with the egg white mixture and bake for an additional 15-20 minutes. If necessary, cover loosely with foil to prevent over browning. Remove from the baking sheet and cool on a wire rack (mine didn't make it to this step, since we started dinner just after they came out of the oven!)


Tip: For an even crispier crust, spray the loaves with water right before baking, and then every 5 minutes for the first 10 minutes of baking.

the top loaf is the garlic, the bottom is plain bread

Add-Ins: To make flavored bread (like I did), add in the ingredients before rolling the dough up. Then roll, sprinkle a little more on top and finish the recipe.

  • Butter, garlic and parmesan cheese for garlic bread (see above)
  • Butter, cinnamon and sugar
  • Fresh or dried herbs
  • Cheddar or mozzarella cheese

It was yummy! and my house smelled SOOO good!! All the possible variations on things you could put inside make this a very versatile bread that would be great at any time of day!

Tuesday, May 31, 2011

Sooner than expected: Oatmeal Cookies

Well, so much for my apology earlier...this recipe was easy and quick and supposedly healthy ;-)


It's made with lots of stuff that's good for you, while still being sweet and filling that "I need a cookie NOW" craving! It isn't the most amazing cookie I've ever made, but it was easy and sweet enough to fulfill a craving pretty quickly without much fat.

I found the recipe here, and they said that they found it on Food Network. There is so much versatility! I made two batches, one with chocolate chips and the other with butterscotch chips, but the recipes have lots of other suggestions for mix-ins!

Ingredients
3 tablespoons butter, room temperature
1/2 cup brown sugar
1/4 cup honey
1 egg
1 tablespoon water
1/2 cup flour (I used all purpose)
1/2 teaspoon salt
1/4 teaspoon baking soda
1 1/2 cups rolled oats
mix-ins

Directions
1. Preheat your oven to 350*. Spray a cookie sheet with nonstick cooking spray. (This was convenient, but I don't think it's necessary to get a good cookie.)
2. Mix together (I used my hand mixer) the butter, brown sugar, honey, egg and water until thoroughly combined.

3. Sift together the flour, salt and baking soda. Then add the oats.


Add the dry ingredients to the wet, and mix well. Add your mix-ins to the blended batter.
chocolate chip version

butterscotch version
4. Drop by heaping teaspoonfuls onto the cookie sheet.

Bake 12 to 15 minutes. Cool on a wire rack.

((Note: because I'm at high altitude and didn't adjust the recipe, I didn't actually cook the cookies at the time or temperature recommended. I always lower my temperature and just keep a close eye on the cookies while they're baking because I have a hard time getting cookies that don't burn or end up super flat. Just my two cents...if you're baking at sea level, you can follow the recipe as is and probably have no issues whatsoever :-)))
Yum!

Dreadfully sorry...

I have not been making anything exciting in the last few days...so I haven't posted anything. My brother-in-law is visiting this week, and my in-laws join us next week, so I have pretty standard recipes set up to make for easy meals and less time spent in the kitchen.

I do have a couple of fun dessert recipes I plan to try in these next few weeks though, so keep an eye out!

For now, I'll share a picture of "Territory Days" in Colorado Springs for Memorial Day, where myself, Lane, Ethan, my sister Emily and brother-in-law Tyler spent the afternoon eating various foods and looking at all the overpriced stuff ;-)

This was Ethan's favorite part of the day:
Turkey Legs! "Don't they make you feel like a man?"

Thursday, May 26, 2011

Blueberry waffle sauce

Oh my word. Blueberries are now my new favorite waffle topping. They were so yummy and sweet!! ((and I totally didn't take any pictures, but our dinner was AWESOME and looked GREAT too!!))

Another Special K recipe which was easy to make, and delicious to eat. Again only made for one serving though, so I doubled the recipe and it made enough for 3 waffles for Lane and myself (6 total) and 1 waffle for Ethan, with a little left over in the bottom of the pot still...

Only a few ingredients too!
Ingredients
3 tablespoons sugar
1 teaspoon cornstarch
1 teaspoon grated lemon peel (I didn't use this because I was cooking a lot of different sides and didn't want to take the time to grate the lemon :-P)
3 tablespoons water
1 cup fresh blueberries, divided (see my note in the directions)
3 waffles (for the Special K recipe I used the Eggo Nutri-Grain Whole Wheat waffles, but you could totally use this on homemade waffles too!)

Directions
1. In a small saucepan, stir together the sugar, cornstarch and lemon peel. Whisk in the water.
2. Stir in 1/2 cup of the blueberries, crushing slightly. (I put in an entire cup since I had doubled the recipe, and when I got to the end of the recipe, I decided that there was plenty of blueberry-ness without adding another cup of uncooked berries, though I'm sure they would have been great!)
3. Cook and stir over medium heat until mixture thickens and boils. Stir in the rest of the blueberries (if you decide to) and remove from heat.
4. Serve over waffles (or pancakes, or biscuits, or whatever else sounds delicious with sweet, warm blueberry sauce!!)

Easy and yummy. Even Ethan liked it! We ate ours with scrambled eggs (with cheese), apple juice and turkey bacon (which, though not bad, just isn't real bacon...I'm switching back to regular bacon next week, and I'll just eat less of it!)

Enjoy!!

Wednesday, May 25, 2011

A surprise post - Tortillas and Flautas!

I wasn't planning on posting anything today because I was feeling unproductive and had a (normally) boring dinner planned for tonight.

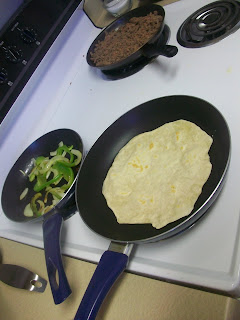
But! Then I did a little workout and got a nice hot shower and felt much more productive...so I decided to try out the homemade tortilla recipe I've been saving. And though last night's attempt at food didn't turn out so well, these were great!
and so easy! They made dinner and dessert!!

My recipe is a little different step-wise than the original, but it's the same ingredients and basic principle :-)

Homemade Tortillas (original)
Ingredients
3 cups flour
1 tsp. salt
1/3 cup vegetable oil
1 cup warm water

1. Mix all the ingredients until they form a dough.
2. Roll the dough into several small balls. (My batch made 7) Flatten each ball into a tortilla. (I used my rolling pin)
3. Cook each tortilla in a flat pan on the stove until each side has the little brown spots you see on store-bought tortillas.

Burrito night!

SO yummy!!

And then we made them into dessert....oh yes.

This is the original recipe that I based our dessert flautas off, but I kinda just went off the cuff while making them.

Ingredients
Peeled, sliced apples (I used 2 medium sized apples)
cinnamon-sugar
lemon juice
tortillas
butter

Directions
1. Coat cut apples with lemon juice and cinnamon-sugar. (I made mine ahead of time, and let it sit in the fridge)
2. melt a couple tablespoons of butter in a pan on the stove (I used the same pan that I had used for tortillas), brush onto the tortillas. Sprinkle tortillas (both sides) with cinnamon-sugar.
3. Put the tortillas on a cookie sheet and warm them in the oven for a minute or two.
4. Meanwhile, cook the apple mixture in the remainder of the butter until the juice is bubbly.
5. Take the tortillas out of the oven and roll them up carefully. Return to the oven.
6. Continue warming the tortillas in the oven until the apples are soft. Then, carefully open the tortilla wraps and fill with the apple mixture. Roll the tortillas carefully back up, and enjoy!
We had ours with vanilla frozen yogurt!

Monday, May 23, 2011

Teriyaki Chicken Kabobs

Do you know what I love best about grilling?


Not the delicious smoky smell...not that perfect grill flavor...

Give up?

The general lack of dishes that have to be done afterward. No pans, no skillets...just plates...and maybe a few utensils depending on what you cook...

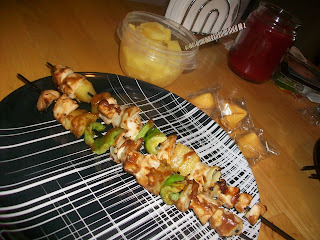
Ha! I was so excited to have these Teriyaki Chicken Kabobs for day 2 of my better eating from Special K. But the best part was the small amount of dishes I had to do this evening after our busy day out of the house.

And they were AMAZING. I'm not normally a kabob person. Usually because they involve pointy sticks filled with grilled veggies and I'm not a veggie person.

But these looked amazing, smelled amazing while making them, and tasted amazing for dinner! Yay for amazing!! When making them, again note that this recipe only makes ONE serving, so you have to multiply the recipe by the amount of people you are serving :-)

Ingredients
1 medium boneless skinless chicken breast (about 6 oz)
1/2 cup reduced-sodium teriyaki marinade/sauce
1 teaspoon rice vinegar
((note: the original recipe calls for red pepper, but I don't care for it much and there was already a bit in my teriyaki sauce, so I left it out))
1/2 teaspoon cornstarch

((another note: the second half of this recipe is for rice upon which to serve the kabobs...but (you guessed it), I'm not a rice person, and didn't want the hassle of cooking rice (probably the reason for the lack of dishes tonight ;-)), so instead we added pieces of pineapple, onion and green bell pepper to a few of the kabobs (for Lane). See the original recipe for how to cook their rice :-))

Aren't they pretty?
Directions
1. Cut the chicken into 1 inch pieces. Place in a resealable plastic bag.
2. In a small (tupperware works best!) bowl, mix the marinade, vinegar and pepper if you're using it. Pour 2 tablespoons of this mixture over the chicken. Seal bag and refrigerate for 2-24 hours, turning occasionally. Cover and refrigerate the remainder of the teriyaki mixture until needed later.
3. Drain chicken and discard used marinade. Thread the pieces of chicken onto two small skewers (or a big one like I used!). In a small microwaveable bowl (if you used tupperware in the previous step, you should be okay to just reuse rather than get a new bowl dirty...yay for fewer dishes!!), stir together reserved teriyaki mixture and cornstarch. Microwave on high for 30 seconds to 1 minute until boiling and slightly thickened, stirring once. Set aside.
4. Grill skewers directly over medium heat for 6-9 minutes or until no longer pink, turning kabobs frequently. During the last 2 minutes of grilling, brush the kabobs with the thickened teriyaki mixture.
Plain chicken like the recipe calls for


Chicken with onions, peppers and pineapple - ala Lane :-)

Lane ate some extra pineapple with his kabobs, while I followed the suggestions from Special K and had 1/2 cup strawberries with 1/2 cup frozen yogurt (I used frozen though the original called for regular yogurt. I needed the feel of sugar) along with a couple teaspoons of chocolate chips!
  
Lane's dinner
My (yummier) dinner!
And everyone enjoyed a couple of fortune cookies (also a suggestion from Special K!) which were very fun!!
Ethan is going to be successful in his career...that's good to know I guess!
It was a great ending to a fun day, and I totally suggest trying this recipe!! I'm definitely going to be having these again next week when we have company!